Monthly Archives: October 2016
AddOn DFS Replication Management Pack (part #1 – configuration)
This article is to serve as documentation for my recent MP addition to TechNet gallery: https://gallery.technet.microsoft.com/AddOn-DFS-Replication-33d233a8.
I split the documentation into part #1 (configuration) and part #2 (featured monitoring).
The AddOn Distributed File System (DFS) Replication Management Pack for System Center Operations Manager 2012 monitors the health of DFS Replication by complementing the monitoring provided by Microsoft Management Packs:
– System Center 2012 Management Pack for Microsoft Windows Server File & iSCSI Services 2012 R2 (https://www.microsoft.com/en-us/download/details.aspx?id=42066)
– System Center 2012 Management Pack for Microsoft Windows Server File & iSCSI Services 2012 (https://www.microsoft.com/en-ca/download/details.aspx?id=34970)
Here are the Management Packs that you need to have imported in the first place:

Plus the following MP, specifically for the presentation MP (visualization):

Get this MP from:
https://gallery.technet.microsoft.com/Powershell-Grid-Widget-919dc3d6
All agents need to have the Agent Proxy setting enabled (Allow this agent to act as a proxy and discover managed objects on other computers).
Make sure that Firewalls are not blocking WMI remote connections – a lot of workflows in the DFS MPs are using WMI queries (local and remote).
Add a Windows Account with appropriate permissions on DFS. Configure this account for More Secure distribution (no selected computers, for the moment).

The AddOn.DFSReplication MP has configured a group called “Agents On Windows FileServer DFS-R”; members of this group are HealthServices on all Windows FileServer DFS-R role computers. You can use this group to have the “DFR-R Monitoring Account” distributed; just execute the following from Operations Manager Shell:
PS C:\> $distagents = Get-SCOMGroup -DisplayName “Agents On Windows FileServer DFS-R” | Get-SCOMClassInstance
PS C:\> Get-SCOMRunAsAccount -Name “DFS-R Monitoring Account” | Set-SCOMRunAsDistribution -MoreSecure -SecureDistribution $distagents
Note. Please update the commands above for whatever name you provided to the DFS-R monitoring account; in case you used exactly same name as in the screenshot, then you can use (cut and paste) the commands as they are provided.
Verification:

Last step is to associate the Profile with the RunAs account just created.

In part #2 I will detail what additional monitoring is provided by this Management Pack.
AddOn DFS Replication Management Pack (part #2 – featured monitoring)
This is second part of the documentation for my recent MP addition to TechNet Gallery: https://gallery.technet.microsoft.com/AddOn-DFS-Replication-33d233a8.
Discoveries
The AddOn.DFSReplication MP introduces a new class “DFS-R Replication Connection”. It is very similar to the “Replication Connection” defined by the Microsoft Windows Server DFS Replication MP, the only difference is that it doesn’t have the BacklogCount property – instead being a property it would be more appropriate to be a monitored counter.
AddOn.DFSReplication MP discovers by default instances of this new class.
Check the “DFS-R Replication Connection” instances discovered in the “DFS-R Replication Connections” dashboard.
Note. “Replication Connection” class instances are not discovered by default by Microsoft Windows Server DFS Replication MP; even enabled, in some cases, it fails to discover all the DFS-R replication connections.
Monitors
Three new monitors are added by AddOn.DFSReplication MP:
DFS-R: Backlog File Count (Monitor) – periodically (every 1h) checks the backlog file count and triggers warning alert in case its value is not zero.
DFSRDIAG Error Check (Monitor) – periodically (every 1h) checks that DFSRDIAG executes without encountering errors; in case errors are found it triggers warning alert.

DFS-R: Replication Service stopped replication on Volume – looks after event id 2213 in DFS Replication log; this event id is missed by the Microsoft DFS Replication MPs and actually a good indication of issues with replication.

Sample generated alerts:

Tasks
The following tasks are added by AddOn.DFSReplication MP:
“Resume Replication” for “Replication Volume”
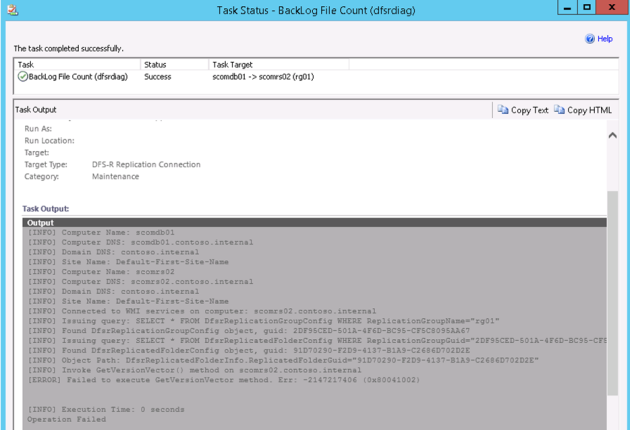
“BackLof File Count (dfsrdiag)” for “DFS-R Replication Connection”
“DFSRDIAG SyncNow” for “DFS-R Replication Connection”
“DFSRDIAG PollAD” for “DFS Replication Service”
All tasks are executed in the “DFS Replication Monitoring Account” security context and are returning verbose output of the actions performed. All parameters are filled in contextually, from target properties.
Examples below:


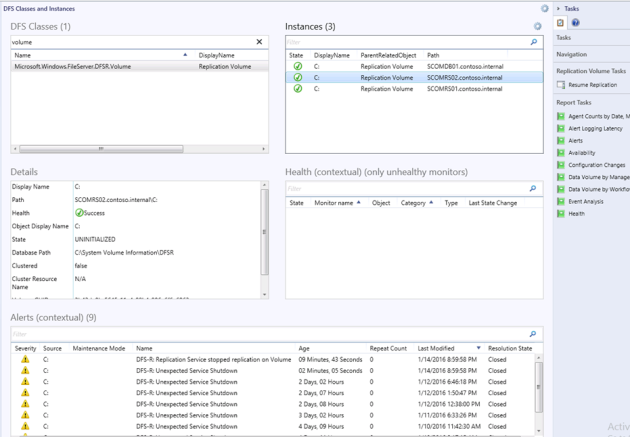
Dashboards
All DFS active monitoring is performed by monitors and not rules. This means it is safe to assume that detected issues are reflected in state changes.
Here are the screenshots for the dashboards that are configured in the AddOn.DFSRReplication.Presentation MP:

References
http://blogs.technet.com/b/askds/archive/2010/11/01/common-dfsr-configuration-mistakes-and-oversights.aspx
http://www.mysysadmintips.com/windows/servers/499-dfs-replication-stops-after-unexpected-server-shutdown
http://www.mysysadmintips.com/windows/servers/500-error-while-checking-dfs-replication-backlog-2147217406-0x80041002
SCOM Maintenance Mode Scheduling Solution (Optimized and Free)
When it comes to scheduling maintenance mode in SCOM you can probably find quite a few solutions posted on Internet. This blogpost is presenting yet another (free) solution. Who knows, perhaps you’ll appreciate the simplicity of it…
My solution is leveraging only basic SCOM features: Computer Groups, System.Scheduler data source module type and VSAE snippets. In a few minutes you will be able to create your own Management Pack that will do the Maintenance Mode scheduling for you. From then on, you’ll just have to maintain this Management Pack in a very convenient way, as easy as (re)importing a csv file. Plus you’ll have to author some Computer Groups and you’re done.
Here are the steps:
1/ Using Visual Studio create a new Project (Operations Manager 2012 R2 Management Pack): call it MaintModeScheduling
2/ You will need a custom Write Action Module Type so create a MP Fragment for that like the one presented below:
<ManagementPackFragment SchemaVersion="2.0" xmlns:xsd="http://www.w3.org/2001/XMLSchema">
  <TypeDefinitions>
    <ModuleTypes>
      <WriteActionModuleType ID="MaintModeScheduling.StartMMForGroup.WA" Accessibility="Public" >
        <Configuration>
          <xsd:element name="ComputerGroupDisplayName" type="xsd:string" minOccurs="1" maxOccurs="1"/>
          <xsd:element name="ForHowLongInMin" type="xsd:integer" minOccurs="1" maxOccurs="1"/>
          <xsd:element name="Comment" type="xsd:string" minOccurs="1" maxOccurs="1"/>
        </Configuration>
        <OverrideableParameters>
        </OverrideableParameters>
        <ModuleImplementation>
          <Composite>
            <MemberModules>
              <WriteAction ID="WA" TypeID="Windows!Microsoft.Windows.PowerShellPropertyBagWriteAction" >
                <ScriptName>Start-SCOMMaintModeForGroup.ps1</ScriptName>
                <ScriptBody>$IncludeFileContent/Scripts/Start-GroupMaintMode.ps1$</ScriptBody>
                <SnapIns>
                </SnapIns>
                <Parameters>
                  <Parameter>
                    <Name>ComputerGroupDisplayName</Name>
                    <Value>$Config/ComputerGroupDisplayName$</Value>
                  </Parameter>
                  <Parameter>
                    <Name>ForHowLongInMin</Name>
                    <Value>$Config/ForHowLongInMin$</Value>
                  </Parameter>
                  <Parameter>
                    <Name>Comment</Name>
                    <Value>$Config/Comment$</Value>
                  </Parameter>
                </Parameters>
                <TimeoutSeconds>300</TimeoutSeconds>
              </WriteAction>
            </MemberModules>
            <Composition>
              <Node ID="WA"/>
            </Composition>
          </Composite>
        </ModuleImplementation>
        <InputType>System!System.BaseData</InputType>
      </WriteActionModuleType>
    </ModuleTypes>
  </TypeDefinitions>
</ManagementPackFragment>
3/ Add a new folder to the solution called Scripts; then add a PowerShell script file resource to this folder, name the script “Start-GroupMaintMode.ps1” and copy the following content to the file
<#  .SYNOPSIS Places all members of a SCOM Computer Group in maintenance mode. .DESCRIPTION Places all members of a SCOM Computer Group in maintenance mode. .EXAMPLE  Start-GroupMaintMode.ps1 -ComputerGroupDisplayName "GroupA" -ForHowLongInMin 10 -Comment "Testing Maintenance Mode" -Verbose  Puts all Members of the "GroupA" Group in Maintenance Mode for 10 minutes with Comment "Testing Maintenance Mode". Adding Verbose information. .PARAMETER ComputerGroupDisplayName = The SCOM Computer Group name for which members you want to put in Maintenance Mode.  .PARAMETER ForHowLongInMin = The Maintenance Mode Interval .PARAMETER Comment = The Maintenance Mode Comment #>

[CmdletBinding(SupportsShouldProcess=$true)]

param([string[]]$ComputerGroupDisplayName,[int]$ForHowLongInMin,[string]$Comment)

$Reason = "PlannedApplicationMaintenance"

$MS = gc env:computername
$ScriptName = "Start-GroupMaintMode.ps1"
$LogEventID = 509

$evt = New-Object System.Diagnostics.EventLog("Operations Manager")
$evt.Source = "MMScheduling"
$infoevent  = [System.Diagnostics.EventLogEntryType]::Information
$warnevent  = [System.Diagnostics.EventLogEntryType]::Warning
$errorevent = [System.Diagnostics.EventLogEntryType]::Error

Write-Verbose "Script $ScriptName started on $MS"
$evt.WriteEntry("Script $ScriptName started on $MS",$infoevent,$LogEventID)

$ModuleImportError = $false
Try
{
	$setupKey = Get-Item -Path "HKLM:\Software\Microsoft\Microsoft Operations Manager\3.0\Setup"
	$installDirectory = $setupKey.GetValue("InstallDirectory") | Split-Path
	$psmPath = $installdirectory + ‘\Powershell\OperationsManager\OperationsManager.psm1’

	Import-Module $psmPath

	$conn = (New-SCOMManagementGroupConnection –ComputerName $MS)
}
Catch [system.exception]
{
	Write-Verbose "Errors detected while importing module OperationsManager on $MS; $error"
	$evt.WriteEntry("Errors detected while importing module OperationsManager on $MS; $error",$errorevent,$LogEventID)
	$ModuleImportError = $true
}

If (!$ModuleImportError)
{
	$Groups = Get-SCOMGroup -DisplayName $ComputerGroupDisplayName

	if($Groups -ne $null)
	{
		foreach ($Group in $Groups)
		{
			If ($Group.InMaintenanceMode -eq $false)
			{
				Write-Verbose "Starting Maintenance Mode for $Group.DisplayName"
				$evt.WriteEntry("Starting Maintenance Mode for $Group.DisplayName",$infoevent,$LogEventID)
				$Group.ScheduleMaintenanceMode([datetime]::Now.touniversaltime(), ([datetime]::Now).addminutes($ForHowLongInMin).touniversaltime(), "$Reason", "$Comment" , "Recursive")
			}
		}
	}
}
4/ Add a snippet template to the solution (Right click on solution, Add / New Item/ Management Pack / Code / Snippet Template); name it StartMMForGroup.templatesnippet; copy/paste the following MP fragment to this snippet template:
<ManagementPackFragment SchemaVersion="2.0">
  <Monitoring>
    <Rules>
      <Rule ID="#text('Rule Id')#" Target="SC!Microsoft.SystemCenter.RootManagementServer" Enabled="#text('Enabled')#" ConfirmDelivery="false" Remotable="true" Priority="Normal" DiscardLevel="100">
        <Category>Operations</Category>
        <DataSources>
          <DataSource ID="DS" TypeID="System!System.Scheduler">
            <Scheduler>
              <WeeklySchedule>
                <Windows>
                  <Daily>
                    <Start>#text('StartTime')#</Start>
                    <End>#text('StartTime')#</End>
                    <DaysOfWeekMask>#text('DaysOfWeekMask')#</DaysOfWeekMask>
                  </Daily>
                </Windows>
              </WeeklySchedule>
              <ExcludeDates />
            </Scheduler>
          </DataSource>
        </DataSources>
        <WriteActions>
          <WriteAction ID="WA" TypeID="MaintModeScheduling.StartMMForGroup.WA">
            <ComputerGroupDisplayName>#text('ComputerGroupDisplayName')#</ComputerGroupDisplayName>
            <ForHowLongInMin>#text('ForHowLongInMin')#</ForHowLongInMin>
            <Comment>#text('Comment')#</Comment>
          </WriteAction>
        </WriteActions>
      </Rule>
    </Rules>
  </Monitoring>
  <LanguagePacks>
    <LanguagePack ID="ENU" IsDefault="true">
      <DisplayStrings>
        <DisplayString ElementID="#text('Rule Id')#">
          <Name>#text('Rule Id')#</Name>
        </DisplayString>
      </DisplayStrings>
    </LanguagePack>
  </LanguagePacks>
</ManagementPackFragment>
5/ Add snippet data to the solution (Right click on solution, Add / New Item / Management Pack / Templates / Snippet Data); call it StartMMForGroup.mpsd; then press the “Select snippet type” button and you’ll have the only option “StartMMForGroup”.
Add few items according to your needs. I think the parameter names are self-explanatory. In case in doubt what to enter for DaysOfWeekMask please refer to the PublicSchedulerType complex data type (https://msdn.microsoft.com/en-us/library/ee692976.aspx). If it’s more convenient you can Import from CSV file the data at this step.
Note that Visual Studio will perform syntax checking at this step for the data that you enter.
6/ Build your solution and import the MP. The rules in the MP will take care of the Maintenance Mode Scheduling exactly as you wrote the instructions in the snippet data. Maintain the snippet data to reflect the needs of Maintenance Mode Scheduling in your organization (and don’t forget to combine this with accurate Computer Groups membership definitions)
Enjoy…
